Wednesday, 26 November 2014

Learning Outcome 3: Be able to select and use software to communicate information for a business purpose

Use tools and facilities appropriate to the software - Creating and Modifying documents
To modify existing documents you need to locate the file you want to modify in your documents. For this you can locate it by pressing the spotlight icon in the top right of the screen (Apple Mac) or search in the Start Menu at the bottom left of the screen (Windows). Once you find your file you can either left click it to open it with the default program or right click it to choose from a list of applicable programs what to open it with (if there are any others). From here you can modify the file.

To create a document, you need to open your desired program and, from the options it gives you, create a new document. This is different for almost every program but they are all (usually) visible. Here are some examples of what different programs look like:
   Microsoft Desktop Publishing


Apple Desktop Publishing (Pages)


Whilst choosing the type of new document you want, you can also choose ready made templates for leaflets, magazines, reports, cards and even invoices. All you have to do is to choose the option at the side of the box you see when choosing your type of 'new' document.


Learning Outcome 3: Be able to select and use software to communicate information for a business purpose

Use tools and facilities appropriate to the software
Entering text/images into a document is fairly straight forward. For many documents, you can just start to type on the keyboard to input text (if they are common Desktop Publishing programs like Pages or Microsoft Word). If this doesn't work for some reason or the package you use doesn't support this, you can press the button on the top toolbar that says 'Text'.
To import images you can either:
1. Copy and paste
2. Import via Media or Insert
3. Drag and drop

I find it most easy to jut drag and drop the image into a document (by holding down left click and dragging the image to where you want it to be) but the other ways are just as good. To copy and paste an image, you right click on the image and select the 'Copy' option in the drop down menu.
Then in the document, you do the same but click 'Paste' instead of 'Copy'. The other way is to right click on the image and press 'Save Image As...' which brings you to a save directory where you can name the image and save it somewhere you can find it easily - like your desktop for example. Then after this you can insert the image by either dragging in the file or importing it via the 'Media' tab or 'Import' tab. To resize these images, all you have to do is to click it and use the little squares that appear in the corners and the centre of each side to push and pull, changing the size. It is important to select the right type of graphic and font to math the template or document style you are using (for a invitation, you would use a classic font unlike a informal leaflet that is designed to catch your eye with funk text and graphics that match)


Tuesday, 25 November 2014

Learning Outcome 3: Be able to select and use software to communicate information for a business purpose

Import txt and rtf files and save in an appropriate file type to retain formatting
When importing .txt files and .rtf files, they are sometimes converted when opened with certain programs on certain operating systems. For example, when opened on an older Apple machine, they can be changed to a .note and this means they may not be able to be opened on other operating systems. An easy way to avoid this is to select the '.txt' option in the drop down menu whilst saving it for the first time or saving as something else. This will keep the same extention.

Learning Outcome 2: Be able to select and use software to handle data

Printing databases:
Printing selected data in a database is a fairly easy thing to do. All you basically need to do is go to the tab at the top saying 'Page Layout' (in Microsoft Excel) or under 'Print Range' in the Format drop down menu in NeoOffice where you select the highlighted area in the database and press 'Add'. Then whilst in this menu you go to the tab that says Sheet or Print to choose what you want to print out and what not to.
Here you can also choose to print put certain versions of whats in the cells - formula, plain data, groups of data and/or headers etc...

Tuesday, 18 November 2014

Learning Outcome 2: Be able to select and use software to handle data

Creating Databases

'Flat File' Databases
When you first set up your database, you can choose to make a 'flat-file' database in the options it gives you. This must however be saved in the correct file type (csv.) when you choose your save options.

To enter new data to files, all you have to do is double click on the box you want to use before entering your data. This is the same or editing data but instead of clicking twice you click three times to put the cursor in the part of the characters you want to edit. To delete, you highlight the box(es) and press the backspace key.

To sort the table, you can press the button that looks like:[A-Z] to sort alphabetically and [Z-A] to inverse. To query a single table you can 'Auto Filter', 'Standard Filter' and 'Advanced Filter'. With the Auto Filter, you highlight the data you want to filter and press the option (under the data drop-down menu). This then gives you small drop down menus on the headers of each column so you can filter them accordingly as shown below.


The standard filter is a little more complicated than this; when you click the option you get a popup that looks like this:
                               
Here is where you can choose the criteria of search in what column (like the auto filter but with more control). Then you enter how you want to search based on the column headings and how they need to be sorted. For example, I chose Initials beginning with K, this is what I got as a result from the database:


For the advanced search, it is even more complex due to having to make the search criteria yourself instead of choosing from various valid search options like the others. Here is what it looks like:


Learning Outcome 2: Be able to select and use software to handle data

Printing data from spreadsheets:
There are three different formats you can print a spreadsheet in; they are:
Spreadsheet view
Formulae view
Selected data

The spreadsheet is already in 'spreadsheet view' but for formulae view you:

Hold down the ctrl (cmd) key and press the key ¬¦·. This makes your worksheet show its formulas, not the results. To print your sheet, hold down control(command) key and press the ¬¦· key again.

To print selected data you: 

Open the spreadsheet with the data you need and hold down the Ctrl (cmd) key while highlighting the area of the document you want to print out. Click the Page Layout tab on the top bar, then the Print Area button and Set Print Area to print.

Learning Outcome 2: Be able to select and use software to handle data

Learners must be taught how to use software to handle data, i.e.:

Creating business spreadsheets:
A CSV is a comma separated values file, which allows data to be saved in a table structured format. CSVs look like a garden-variety spreadsheet but with a .csv extension (Traditionally they take the form of a text file containing information separated by commas, hence the name). CSV files can be used with any spreadsheet program, such as Microsoft Excel, Open Office Calc, or Google Spreadsheets.

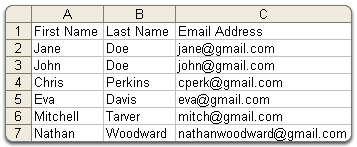
To create one, you can simply create a new spread sheet and make a sort of table with headers in the top row -
It this .csv you can either import information from other spreadsheets or input the data yourself. When making a table (for example contact details), you can name each of the rows/columns to label whats in each one. You can also use equations in these columns like addition and subtractions (these are written directly into the section you wish them to be in); here are some examples:
- SUM(value1, value2)
- AVERAGE(value1, value2)
- MIN(value1, value2)
- MAX(value1, value2)
- IF(logical_expression, value_if_true, value_if_false)

It is good to test the functions by changing the data in the cells you are using the function to make sure it is working properly.You can also add rows and columns to your spreadsheet by pressing the 'Insert' button on the top toolbar and scrolling down the drop down menu until you find 'Insert Row' or "Insert Column'. To insert tables and charts you do the same but press 'Insert Chart' instead. You can change the data in the cells too by double clicking them to highlight the text inside it and then clicking again to get the crosshair into the cell where you can type (you can also amend changes this way). 

You can arrange the data in your cells to by:
Selecting one cell in the column you want to sort.
Press Ctrl(Cmd) + A, to select the entire region.
Check the selected area, to make sure that all the data is included and then press the 'Sort A-Z' button on the sidebar


Tuesday, 11 November 2014

Learning Outcome 1: Be able to use techniques to search for, store and share information

Use email to communicate with others in business contextsThings that you need to do/think about whilst writing an email:
Subject Line: The subject line is an important part of the email as it gives you, the writer, the opportunity to tell the recipient what the email entails.
The Body of the Message: This is where the main message to the recipient goes
CC: A 'carbon copy' is a copy of the note sent to the addressee other than the main addressee.BCC: A 'blind carbon copy' which is similar to that of carbon copy except that the Email address of the recipients specified in this field do not appear in the received message header and the recipients in the To or Cc fields will not know that a copy sent to these address.


The email signature is at the end of the email and it states the signature of the sender. You can also sent files as an attachment on an email by clicking the paper clip on the bottom bar of the email window.

You can also set up a 'out of office' email (auto response email) that sends people who send you emails an automatic email back saying that you are unable to read the email. This can be configured in he settings part of you email.

Emails can be put into folders when they have been read so they can be found for future reference. One very common save folder (for Gmail users) is the 'Archive' folder which is the large folder for saved emails that aren't in specially made folders.

Learning Outcome 1: Be able to use techniques to search for, store and share information

Storing Electronic Information
If folders are named appropriately then things are easier to find in the future. It is especially useful for school work as work can be organised into subjects as shown below.


It is also worth backing up your work on an external hard drive or USB - especially if the folders mean a lot to you (like school work or photos). This can be easily done and it is good to do once in a while, maybe 2-3 weeks.

Password Protection with files and folders is not so common but is imperative if the computer contains private personal details (like bank account details or insurance information. If you choose the files to be protected, they become encrypted and extremely hard to unravel - even by todays technology.

Files can also become very large and full of pictures and work. There is an easy solution to this which is called 'compressing' or 'zipping' which compresses the files into a smaller format meaning they are inaccessible until this process is reversed which as you could guess is called 'unzipping'.

Wednesday, 5 November 2014

Learning Outcome 1: Be able to use techniques to search for, store and share information

Reference all information copied/sourced
Referencing copied/sourced data is easy to find. It is also known as 'Metadata' and is found on original picture copies. It states the source (what it was taken with), the date it was created, and also the time it was taken. Here is an example from Wikimedia Commons.


URL: http://commons.wikimedia.org/wiki/File:Flumserberg_(Schweiz)_--_2011_--_7.jpg

Learning Outcome 1: Be able to use techniques to search for, store and share information

Evaluating validity of information
It is important to check the reliability of a source as not everything on some of the worlds most used sites, like Wikipedia which is mainly public information. To check the reliability of a source it is always good to first look at the start of the URL. If it has https: at the front of the URL it is almost certainly a reliable site unless its known otherwise. Also, site setup by major organisations (e.g. BBC Bitesize) are reliable sources as they are created to a standard.

It is also good to check the age of the piece of information you are trying to view as it the piece is significantly old, it may affect the validity of the information you have found.

Biased information on sites is also an issue when finding legitimate information - especially if the site is supporting something like animal trafficking for example.


Tuesday, 4 November 2014

Learning Outcome 1: Be able to use techniques to search for, store and share information

Use non-internet based sources to find information

There are a few ways that you can find information without using the internet:

- A Local Area Network (LAN) which is a localised system that links computers which are in close  proximity to each other, i.e. an office or a school.

- Wireless Area Network (WLAN) is also known as Wi-Fi which is again used in homes and schools  for someone to connect to a wireless access point to connect devices (like a laptop or mobile device) to the Local Area Network (LAN)

- A CD-ROM is a compact read-only disk that is used as a memory device system readable by a  computer. These are handy to use but are fragile and easily broken if not treated with care.

Learning Outcome 1: Be able to use techniques to search for, store and share information

Select, capture and store graphics and text in compliance with copyright

To select a good image for personal use, you would use an image search engine to look up your selected thing. Eg. A MacBook
Then using the 'Advanced Search' tool (provided by Google) under the settings icon, you can choose the option, under 'Usage Rights' to select the right suitable to you. For personal use, it is best to choose: Free to use, share or modify.


Then you can choose the image you want from the selection chosen for you by the search engine. I chose an image posted on the URL 'en.wikipedia.org' which, from pervious experience, I know to be a trusted site with good quality images. I then select the image I want.


After clicking 'View Image' towards the mid-right of the screen, I have the image on a white background. When right clicking this image you get a few options of how to get the image onto my computer. 


You can either download the image by clicking 'Save Image As...' which gives me the option to save it wherever I need it and also rename it. The other option is to 'Copy' the image which saves it to your clipboard as a temporary storage of the image. This is more useful if you need the image to be used in a document that you are working on as the next time you copy something, it over-rides the previous image/text copied.

Learning Outcome 1: Be able to use techniques to search for, store and share information

Bookmarks

Bookmarks bar with an organised bookmarks folder
It is good to use bookmarks folders so all the URLs of a certain type / certain importance can be kept in the same place that is easily found. This is made by creating the folder (right click on the bookmarks bar) and then bookmarking pages by pressing the star towards the top right of the screen.
Then you name the bookmark what ever you want to call it to find it quickly. Then you select the folder in the drop down menu below the 'Name:' box. Then you have successfully added a bookmark to an organised bookmark folder.